Archive

Posts Tagged ‘server’

Website Optimization 01: disable ETag in apache (debian/ubuntu)

October 20th, 2008 10 comments

From last few months i am working to optimize our somewhereinblog.net server, because right now we are getting huge amount of hits everyday (1,00,000 + hits). In this series i will describe the tricks that i learned 🙂


On my first post of this searies i will talk about ETag. Before disable this, first we need to know what is ETags. From wikipedia:

An ETag (entity tag) is an HTTP response header returned by an HTTP/1.1 compliant web server used to determine change in content at a given URL. When a new HTTP response contains the same ETag as an older HTTP response, the contents are determined to be the same without further downloading. The header is useful for intermediary devices that perform caching, as well as for client web browsers that cache results. One method of generating the ETag is based on the last modified time of the file and the size of the file.

In certain situations, ETags may not improve the performance of a web application. For instance, some ETag generation schemes incorporate the file’s inode on the system. The file’s inode is unique to the file only on one specific machine. If a site has multiple servers, each with its own copy of the file (i.e. load balancing), then a user’s request for the same file may get served by a different machine. In that case, the inode will almost certainly be different and, if it is used to generate the ETag, it will cause the file to be re-downloaded.

So, this is not always helpfull for all type of sites. Always remember, if you are not using anything, you should not enable or kept enable on server.

Apache by default enable this ETags. We need to disable this to get better performance. Here i am describing the steps for debian and ubuntu linux.

We will take help from mod_header to disable ETags, so first we need to enable the mod_header (apache module)

sudo a2enmod header

sudo /etc/init.d/apache2 restart

this command will enable mod_header. Now open /etc/apache2/apache2.conf with your faviourate browser.

sudo nano /etc/apache2/apache2.conf

then paste the under given code to this apache2.conf file

Header unset ETag
FileETag None

now restart the apache2, and check if it working or not. If every thing OK, then you will not see the etags anymore 🙂

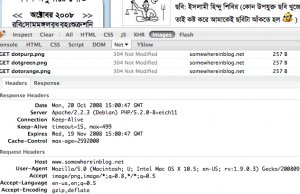
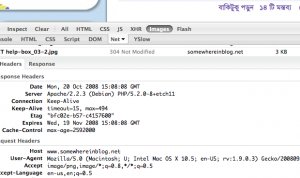
For better understanding i am giving you 2 screenshots.

Before ETag disable


After ETag disable:


If you don’t have root access to server, you still can do this from .htaccess , just copy that code to .htaccess instate of apache conf file.

Ask me if you have any question or problem about ETag.
watch live steaming from softexpo 2008

February 17th, 2008 13 comments

can’t go to softexpo ? you can see the live steaming from somewherein pavilion . to see the live steaming visit http://www.somewhereinblog.net, on the right side bar you will get the link or open mmsh://206.222.3.106:1235 with vlc player.

and this totall system is made and maintained by me, thanks to morshed bhai for his help to design the web interface. 🙂

install imagemagick support to your debian/ubuntu server

February 2nd, 2008 3 comments

imagemagick is one of the best library to work with image. recently i have to install it to our production server. here is what i did:

$ apt-get install imagemagick

it downloads the package and all it’s dependences from debian/ubuntu repository, and installed. now i have to install the support of php (as our product running on php)

$ apt-get install php5-imagick

then i restarted the apache server to take effect this new package installation. if your using php4 then the package name should be php4-imagick

$ /etc/init.d/apache2 restart

that’s all 🙂

if you need imagemagick for your ruby , you can install the librmagick-ruby package.

**if this post doesn’t answer ur question, please post it in comment, i will try to help as much as possible. thanks for ur time.

Database table repair

August 12th, 2007 4 comments

Few minutes ago, one of our mysql database table (it’s really a big table) was crashed.
So to repair this i login that server and excute

repair table tablename

But the repair process failed, and i got this output.

test.t1 | repair | error | 13 when fixing table |
| test.t1 | repair | status | Operation failed |

Then i start searching on google. After passing some time i found the reason. Mysql can’t repair that table as there is a trigger on this table. So i tried to drop the trigger

drop trigger triggername

no luck, mysql can’t drop the trigger, as the table was crashed 🙁

Now i studied more and more. At last i got the solution 🙂

REPAIR TABLE tablename USE_FRM

Now the table repair complete successfully. Thanks to Allah as i got the solution in time:)

Categories: mysql Tags: , ,

subversion installation (1.4.3)

February 7th, 2007 2 comments

A great post about subversion of hasin brother.

On the new version of subversion 1.4.3 u will need to do some thing more. svn-1.4.3 cann’t be install as service. U have take help from 3rd party tools.

Two of them are:

  • SVNService is a free tool written by Magnus Norddahl (not found)
  • SrvAny is avaliable free of charge from Microsoft

or u can use “sc” command to add subversion as service..

Here is the example:
sc create svnserve binpath= "c:svnservesvnserve.exe --service --root
c:repos" displayname= "Subversion" depend= tcpip start= auto
These command must be entered as a single line.

Here bindpath is the where the svnserve.exe is installed, –root is the root directory of
repository, displayname is the name that will display on the windows service list, start = auto is used to start this service on system startup.

Hope it will help you 🙂

75 queries in 0.605 seconds